Create Your First Shopify QR Code
To create your first Shopify QR code with FlashWombat, open Short links, select Create shopping QR, choose what shoppers should do, select the Shopify destination, and name the QR placement. Review the shopper path, then select Create short link and QR placement. FlashWombat creates one editable short link and one named QR placement together.
Use this guide to take that first QR code from an idea to a tested campaign you can measure and maintain.
Before You Create the QR Code
Prepare these decisions first:
- One shopper outcome. Decide whether the scan should open a product, open a collection, prepare a cart, or help a shopper claim an existing offer.
- The Shopify resources. Have the product, variant, collection, or bundle ready to select. For a ready cart, confirm the exact variants and quantities.
- An existing discount code, if needed. Create and test the code in Shopify before using Scan to claim offer. FlashWombat passes the supplied code into the cart flow; Shopify decides whether a shopper can use it.
- One physical use. Decide whether this first code belongs on packaging, an order insert, a poster, an event sign, a retail display, or another placement.
- A campaign owner. Choose who will test the proof, watch the campaign after launch, and update the destination later.
You also need an active FlashWombat plan with room for another short link. A custom domain is optional; you can start with the default FlashWombat domain and connect a branded domain when it suits your campaign.
Choose What Shoppers Should Do
FlashWombat starts with the shopper outcome so you do not have to translate your campaign idea into destination terminology.
| Outcome in FlashWombat | Choose it when | What you will configure |
|---|---|---|
| Scan to view product | Shoppers need product details, options, availability, or education before buying. | One product and variant. |
| Scan to shop collection | Shoppers should browse a range, such as a seasonal collection or event edit. | One Shopify collection. |
| Scan to add product | A reorder card, sample, or insert should prepare a cart with one item. | Exactly one variant and its quantity. |
| Scan to buy bundle | A gift set, kit, or display should prepare a cart with several items. | At least two variants and their quantities. |
| Scan to claim offer | A package insert or event sign should prepare a cart and carry an offer code. | One or more variants, their quantities, and at least one existing Shopify discount code. |
A ready cart removes some steps, but it also leaves less room for a shopper to explore product options. Use Scan to view product when the shopper may need to choose a different variant or learn more before adding the item.
Create the Shopping QR
- In FlashWombat, open Short links.
- Select Create shopping QR.
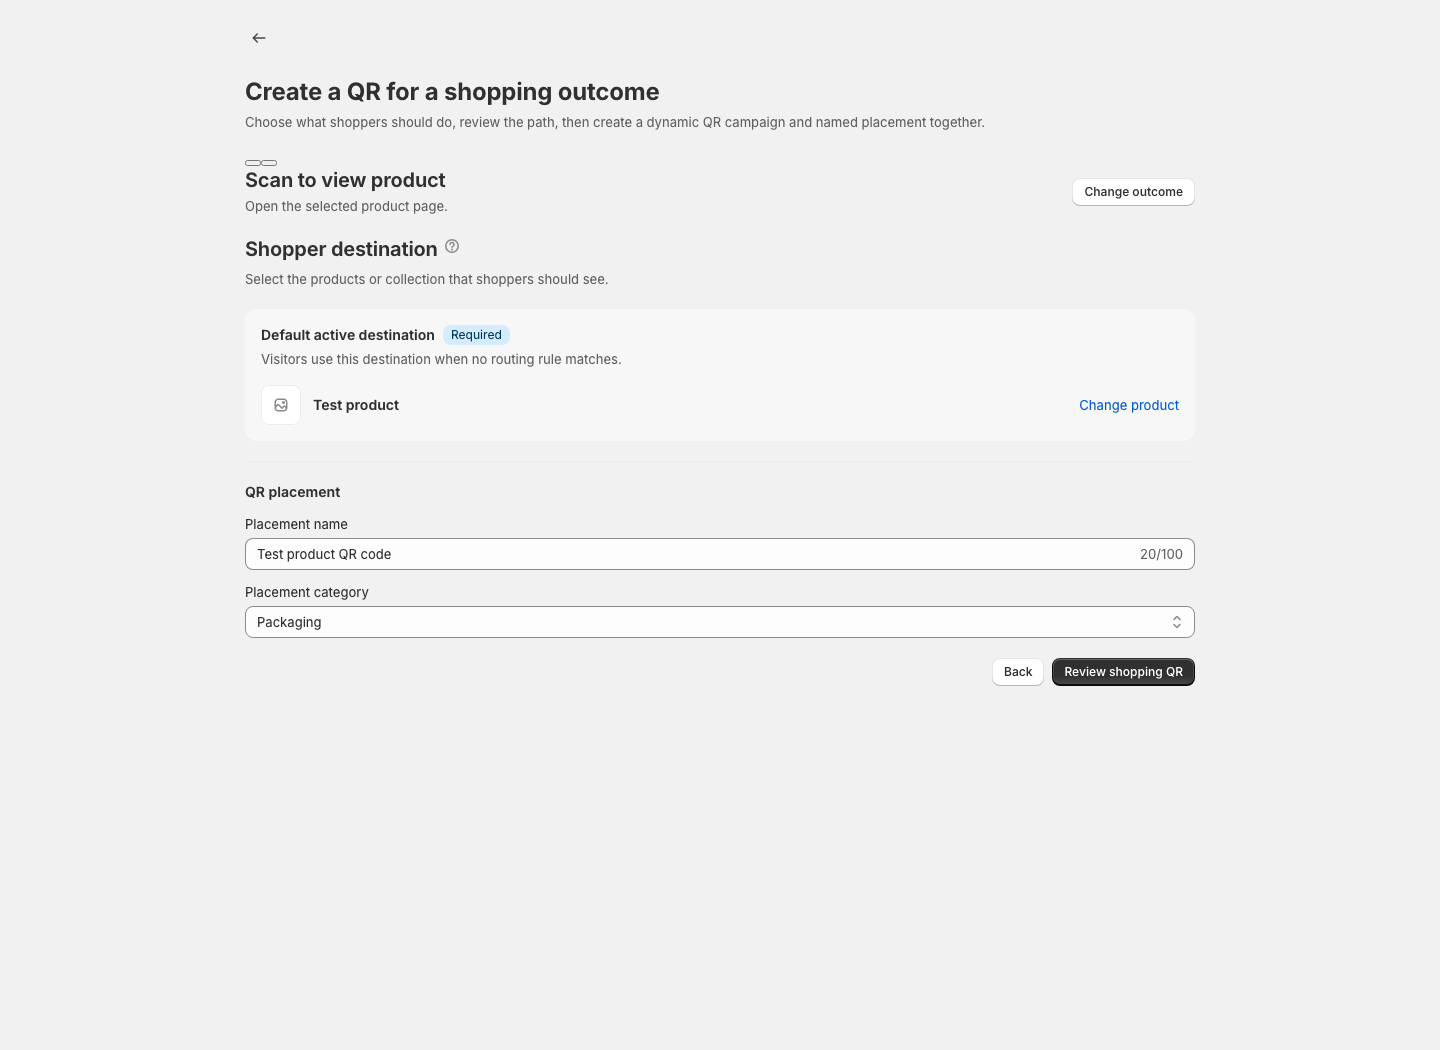
- Under What should shoppers do after they scan?, select the button for your chosen outcome, such as Choose scan to view product.
- In Shopper destination, select the product, collection, or cart items.
- For a cart outcome, check every variant and quantity.
- For Scan to claim offer, enter only discount codes that already exist in Shopify.
- Select Change outcome if the campaign goal has changed.
- Review the suggested Placement name and replace it with a name your team will still understand after the campaign launches. A name such as
Winter market — entrance posteris more useful thanQR code 1. - Choose a Placement category: Packaging, Order insert, Poster, Event, Retail display, or Other.
- Select Review shopping QR.
- On Review shopper path, check:
- The Public short link host.
- The Shopper action.
- The selected product, collection, variants, quantities, and offer codes.
- The QR placement name and category.
- Select Back to details if anything is wrong. Nothing is created until you confirm.
- Select Create short link and QR placement.
The result page says Your shopping QR is ready and confirms that the short link and named placement were created together. From there you can use:
- Download QR code for the default solid-background PNG artwork.
- Edit short link to manage the destination, status, schedule, fallbacks, and QR placement.
- Create another placement when another physical use should follow the same destination but keep its own placement name and visit reporting.
- Create another shopping QR when the next campaign needs a separate short link or shopper journey.
Verify the Configuration Before Downloading Print Artwork
For a physical campaign, do more than download the first file from the success page.
- Select Edit short link and find QR placements.
- Confirm that the parent link says Parent link active, or that its schedule matches the intended launch.
- Under Configuration health, select Check now.
- Read the status and every finding:
- Healthy means FlashWombat found no problem in the configuration it checked.
- Needs attention means review a concern before launch.
- Broken means part of the configured shopper journey is not currently usable as intended.
- Could not complete means the check did not obtain enough evidence. Try again; do not treat it as a healthy result.
Configuration health checks the named placement, parent link, lifecycle state, domain record known to FlashWombat, saved destinations, relevant Shopify resources, fallbacks, and the latest print-readiness evidence. It does not prove external DNS or TLS behavior, test every region or network, or fetch arbitrary raw destinations.
Results can become stale after a campaign change or as their review window passes. Select Check again instead of relying on an old result.
Prepare and Download the QR Artwork
In QR placements, select Design & download for the placement you will publish.
The dependable starting point is the black-and-white design. If you change colors, patterns, the frame, call-to-action text, or add a logo, keep the QR code easy to distinguish from its background. Select Save design to keep the treatment, or Reset to black and white to return to the safe default.
Under Output and print size:
- Choose PNG raster image or SVG vector artwork under Export format.
- PNG is convenient for digital layouts and common design tools.
- SVG is usually the better handoff for scalable print artwork.
- Choose Solid or Transparent under Background.
- Set Print use to Handheld packaging, Tabletop sign, or Poster.
- Enter the real Printed width (mm). FlashWombat calculates the artwork height and checks the selected output.
- Wait for both Configuration health and Print preflight to finish.
- Resolve required fixes and review recommendations. Print preflight checks the exact placement URL and the current artwork/output choices; it is separate from configuration health.
- Select Download checked PNG or Download checked SVG when the current checks allow it.
If FlashWombat shows a warning or high-risk result, the download remains a merchant decision after the relevant review. A check reduces common mistakes, but it cannot guarantee scanning on every phone, printer, material, lighting condition, or viewing distance.
Test One Physical Proof
Never make the full print run your first real-world test.
- Print one proof at the final dimensions on the intended material, or the closest available substitute.
- Place it at the expected height and viewing distance.
- Scan it with multiple phones and camera apps.
- Test on mobile data as well as local Wi-Fi.
- Confirm the browser opens the expected public short-link address and reaches the correct Shopify journey.
- For a cart, check the variants and quantities.
- For an offer, continue far enough to confirm Shopify's current discount behavior.
- Test the scheduled, inactive, or after-campaign journey too if you configured lifecycle fallbacks.
Fix the design, output size, destination, product availability, or offer in the system that owns the problem. Then run fresh checks and print another proof.
Launch the QR Campaign
Immediately before launch:
- Scan the final installed proof again.
- Confirm Active — visitors can use this short link under Status.
- Confirm any campaign start and end dates.
- Configure a useful fallback for signs or packaging that might be seen before the start, while the link is switched off, or after the campaign ends.
- In QR placements, select Mark as printed/in use, check the Printed date and time, and add a Deployment note (optional).
Marking the placement as printed and in use helps FlashWombat warn you before a later link change could affect material that is difficult to replace.
For campaign-specific launch checklists, use Launch Product Packaging with a QR Journey or Run a QR Campaign for a Pop-Up Event.
Measure Directional Results
In QR placements, select View QR visits. Start with these questions:
- Are visits appearing after the campaign launches?
- In Traffic breakdown, does the QR placement view distinguish this placement from other named uses?
- Are Checkouts started or Checkouts completed moving in a useful direction?
- Is one poster, insert, or packaging placement receiving more attention than another?
Interpret the results carefully:
- A QR visit is a visit to a FlashWombat-marked QR URL. It does not prove which camera or scanning app was used.
- Visits are not unique people.
- Placement reporting does not prove that a particular order came from one scan.
- Placement checkout activity is directional, based on the latest FlashWombat-attributed storefront visit within one day. It is not person-level, cross-device, multi-touch, or order-level attribution.
- Estimated revenue is not Shopify order revenue. It uses directional completed-checkout activity and the merchant's current configured value.
Use these signals to decide what to repeat, improve, move, or stop. Use Shopify's order reporting when you need actual order and revenue records.
Maintain the Destination Without Reprinting
The named placement follows its parent short link. Changing the destination is the normal way to keep printed material useful, and it does not require changing the URL already encoded in that placement's artwork.
After an important destination, product, domain, schedule, fallback, or status change:
- Save the link change.
- Run Check again under Configuration health.
- Scan the physical proof again.
- Confirm both the normal shopper journey and any lifecycle fallback.
Avoid deleting the parent short link or changing its public address while printed material is in circulation. When the material is genuinely gone, select Retire material for the placement. Use Keep Printed QR Codes Useful After a Campaign for the full handoff and retirement workflow.
Troubleshoot Your First Shopping QR
I cannot open the shopping QR creator
FlashWombat requires an active plan and available short-link allowance for this workflow. Review the plan screen if the app redirects you there or reports that the maximum number of links has been created.
The wizard will not continue to review
Check that you selected all required Shopify resources:
- Scan to add product needs exactly one product.
- Scan to buy bundle needs at least two products.
- Scan to claim offer needs at least one product and one existing discount code.
- Placement name cannot be empty.
If a product, variant, or collection is reported as unavailable, review its current Shopify state and select an eligible resource.
The download buttons are unavailable
Run Check now. Resolve a stale or incomplete configuration result, then use Design & download and wait for the current print preflight. Broken configuration and print-risk findings require separate review.
The on-screen QR works but the printed proof does not
Return to Design & download. Increase the physical size, restore stronger contrast, remove distortion or a difficult background, or select Reset to black and white. Download the newly checked artwork and test another physical proof.
The scan opens the wrong product or cart
Select Edit short link, correct the Shopper destination, save the link, and test again. You can update the destination without replacing the printed QR address.
Next Steps
Once your first QR campaign is working:
- Connect a custom domain when you want a branded shopper-facing address.
- Follow the product packaging workflow before a packaging print run.
- Follow the pop-up event workflow for posters, counter cards, or event signs.
- Learn how to keep deployed QR codes useful after a promotion ends.
- Review the Shopify Flow automation overview when the same QR work becomes a repeatable store operation. Then choose the relevant FlashWombat Flow actions and FlashWombat Flow triggers.